 |
Solar Cooking Archive Discussion Forums
|
| View previous topic :: View next topic |
| Author |
Message |
coconino
Joined: 21 Nov 2006
Posts: 77
Location: Sunny Brixton
|
 Posted: Thu Jul 12, 2007 12:16 am Post subject: CooKit cooker variation derived from arbitrary units Posted: Thu Jul 12, 2007 12:16 am Post subject: CooKit cooker variation derived from arbitrary units |
 |
|
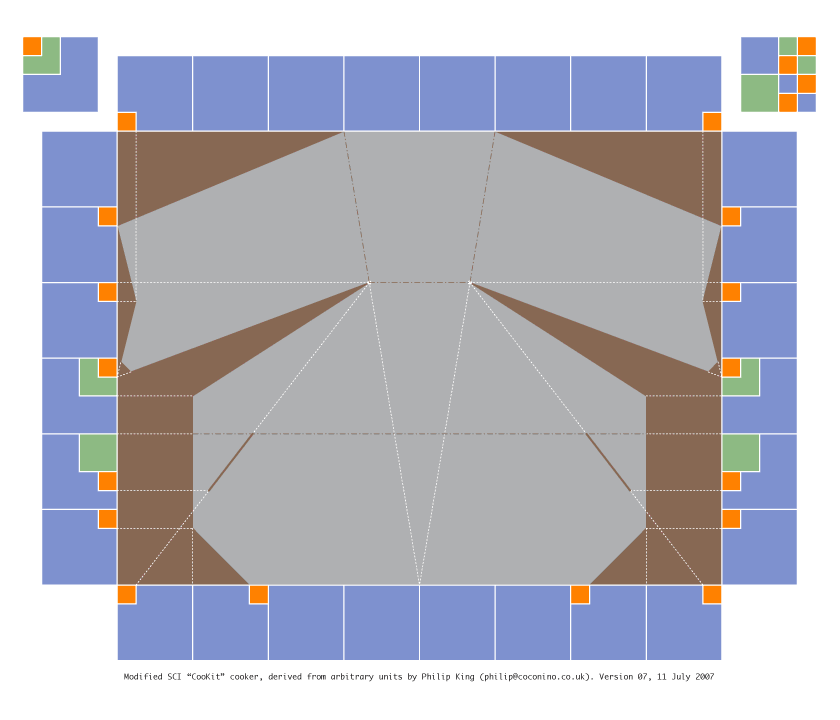
I've made one CooKit and wanted to make more, but each time I've looked at the published plans I've found that they don't suit my way of thinking. I also find them difficult to scale to suit an arbitrary size of material. So, and in case there are others like me who get dizzy looking at all those angles and inches and centimetres, I've drawn my own design with the following intentions:
* to use as few measurements as possible
* to use an arbitrary unit
* to find all angles automatically
* to use straight-line cuts throughout
* to use as few cuts as possible (I could still lose a few)
* to derive details easily without a template
* to eliminate guesswork or fudging
* to reduce the need for written instructions I also wanted it to be as close as possible to SCI's classic and well-proven CooKit design but have some distinctive features of its own.
Of course, the production-line cookers are quite quickly made using templates, so this new plan has no advantage there. It is really intended to help those who are making a one-off cooker out of whatever randomly-sized material they happen to get hold of.
The design which follows is really meant for heavy corrugated board and not intended to fold to a small size (that's not to say it wouldn't if thin enough, I just haven't worked out yet how to derive the folds) and although the back angles are pretty close to the classic design they are different to a couple of degrees. The front panel is deeper and the back lower than in the classic, but not by much.
The chevron cuts in the ends of the side wings are to retain some surface area while also making the tabs narrower to fit the slots. I had an earlier design with a wider base and front panel to accommodate longer slots, but I like this one better, even though it adds a couple of cuts. The chevrons also satisfy my desire for a distinctive feature. The snips off the corners of the wings are to help with very stiff material when fitting the points into the slots; they don't really have to be measured, just a bit snipped off.
The basic unit is the orange block, and a unit size of 1.5 inches gives a sheet size of 48" x 36". Clearly, a unit size of 1" makes a sheet size of 32" x 24". Working in metric, a unit size of 4 cm yields a sheet size of 128 cm x 96 cm, which is about five per cent larger than the 48" x 36" sheet.
I have also made this plan available as a PDF file.
Having just made a full-sized example from this plan I can confirm that it is fast and accurate. However, I know how it's supposed to work, so I would welcome comments from anyone who tries to follow this plan to build a cooker.
 |
|
| Back to top |
|
 |
coconino
Joined: 21 Nov 2006
Posts: 77
Location: Sunny Brixton
|
 Posted: Thu Jul 12, 2007 12:57 am Post subject: Posted: Thu Jul 12, 2007 12:57 am Post subject: |
 |
|
Here's the un-silvered carcass of a CooKit made from the plan above:
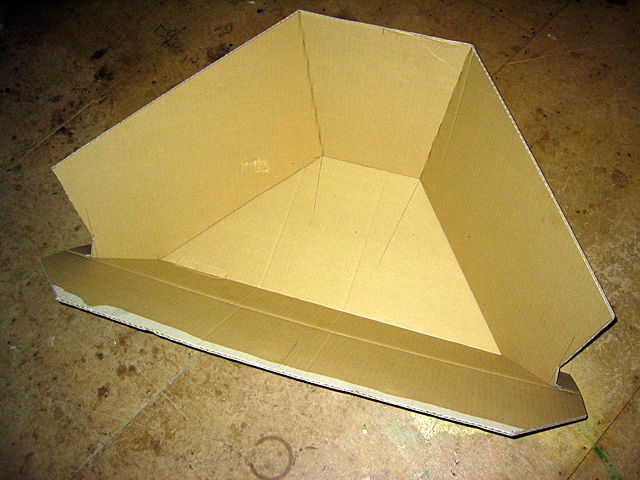
It's clear from this that there was very little marking-out to do. (The crease in the front panel is part of the original carton.)
. |
|
| Back to top |
|
 |
coconino
Joined: 21 Nov 2006
Posts: 77
Location: Sunny Brixton
|
 Posted: Mon Jul 16, 2007 10:38 pm Post subject: Revised version and comparison with SCI plans Posted: Mon Jul 16, 2007 10:38 pm Post subject: Revised version and comparison with SCI plans |
 |
|
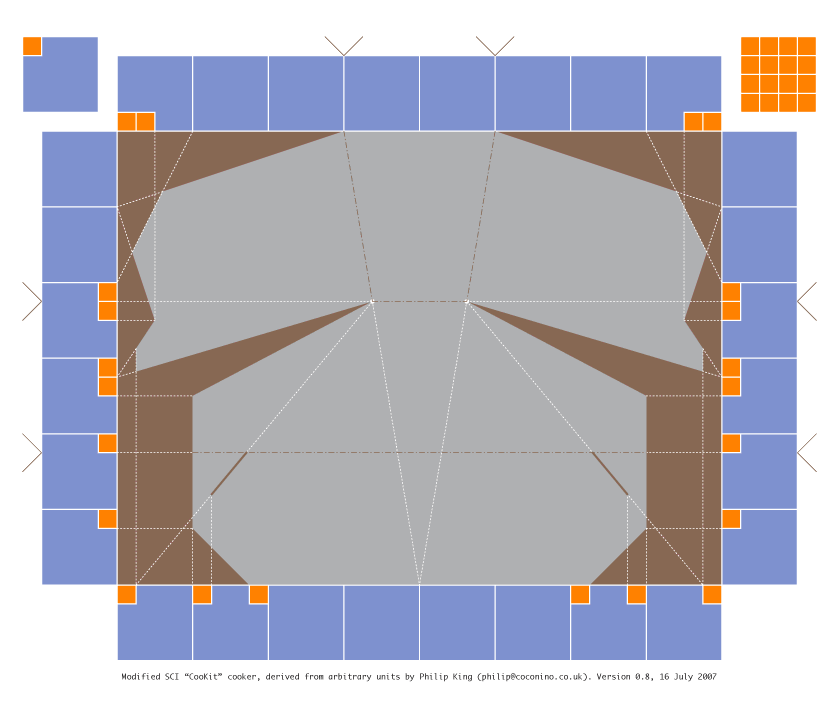
Having now built several prototypes of variations of the above design, I've redrawn the plan to take into account the following:* increase the height of the back panels compared with the front (in the above drawing the front and back are roughly the same height)
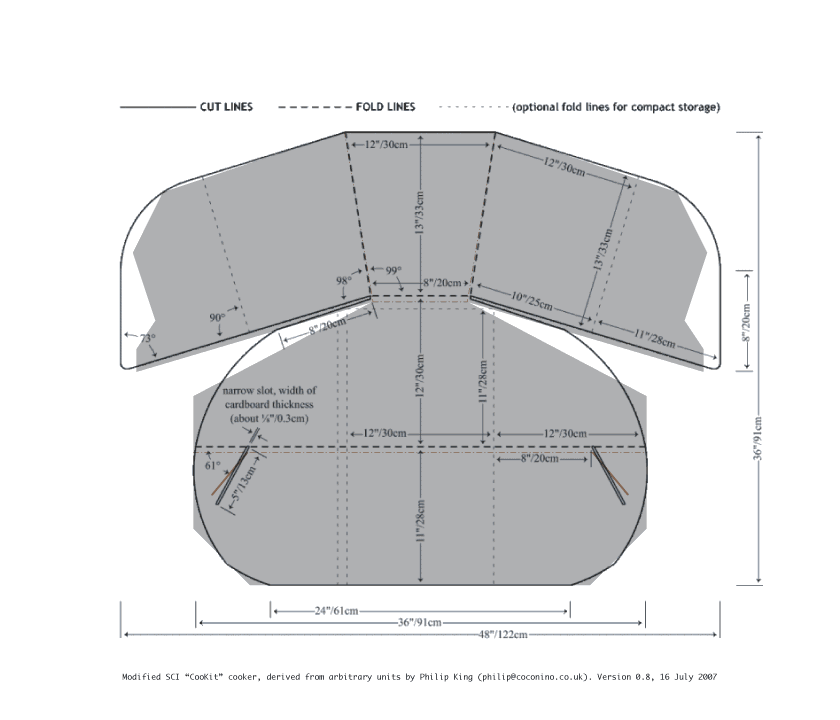
* improve access to the cooker by chamfering the corners of the left and right panels. Also below is a comparison with the SCI plan. As can be seen, this design produces a cooker very close to the SCI original, with the back reflectors angled at 72 degrees from horizontal, which I think is close enough. (I have another version with a shallower angle of 66 degrees).
I prefer the straight edges as these are slightly easier to reinforce with tape. On my current designs I am using shiny 2" aluminium foil tape intended (I think) for use on heating ducts.
As before, there is also a PDF.
Last edited by coconino on Tue Jul 17, 2007 12:50 am; edited 3 times in total |
|
| Back to top |
|
 |
coconino
Joined: 21 Nov 2006
Posts: 77
Location: Sunny Brixton
|
 Posted: Tue Jul 17, 2007 12:02 am Post subject: Posted: Tue Jul 17, 2007 12:02 am Post subject: |
 |
|
Some tips on how to draw from this plan, without aids such as rulers and squares. It should be possible to draw the cooker framework using just the sheet material, a straightedge, pen and cutter.
Sheet material can be checked for squareness by measuring the diagonals (with string) to make sure they are equal; if not equal, the corners aren't square. Thereâs an easy method to correctly square any sheet, which Iâll write up if anyoneâs interested. For a sheet of ratio 3:4 (e.g. 36â x 48â) Pythagoras tells us that the diagonal will be 5, forming a triangle of ratio 3:4:5 (e.g. 36â x 48â x 60â).
Start the drawing by determining the unit size (U). In most cases this will be 1.5", which will yield a cooker the same size as the standard SCI CooKit. However, if the available material is smaller or larger, divide the long side (L) by 32 and check that the short side (S) is at least as long as 24 x (L/32); if itâs not then reduce U until 24 U fits within the short side, and then shorten the long side accordingly.
(By the way, one reason why the long side is set at 32 units wide is because finding the unit size is simply a matter of halving the length: 32, 16, 8, 4, 2, 1).
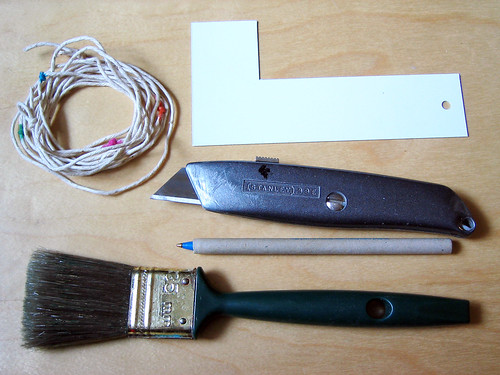
Once the unit is found, make an L-shaped measuring stick, four units long, one unit wide and with a 1 x 1 right-angle part. This provides measurements for one, two, three and four units in a small template (I know, I said no templates).
Choose one corner of the sheet to be the origin for marking-up, such as the top left corner. This way the entire sheet need not be trimmed to size round all four edges, although of course it helps.
Mark the major divisions (blue squares on the plan) around the edge of the area using strong lines, and mark the minor marks with lighter, sorter lines. In most cases the marks only need to go an inch or so onto the sheet.
After marking around the edges itâs just a matter of joining the right marks and finding where lines intersect. Start with the large âVâ in the centre which creates the back panel by joining the centre mark at the bottom to the points 4 units either side of the centre mark at the top. Then find the bottom crease for the back panel by drawing a horizontal line across 9 units from the top.
Once the top-centre panel is drawn, the bottom left and right points of this panel act as anchors for the lines which make the side wings and slots.
All lines are drawn to match points either on the edge of the sheet or where one line intersects another. For instance, the slots are drawn with their bottom ends at the point where a vertical line 5 units in from either end intersects with the diagonal line from the base of the back panel to a point one unit in from each corner.
Make the slots as wide as the thickness of the material. If the finished slots are too loose they can be tightened by using one or more layers of packing tape fed through the slot and folded over both sides (this also strengthens the slots).
When using very thick material it is useful to double-score the two horizontal folds to make the cooker fold more easily.
. |
|
| Back to top |
|
 |
coconino
Joined: 21 Nov 2006
Posts: 77
Location: Sunny Brixton
|
 Posted: Tue Jul 17, 2007 11:52 am Post subject: Photographic comparison with classic CooKit Posted: Tue Jul 17, 2007 11:52 am Post subject: Photographic comparison with classic CooKit |
 |
|
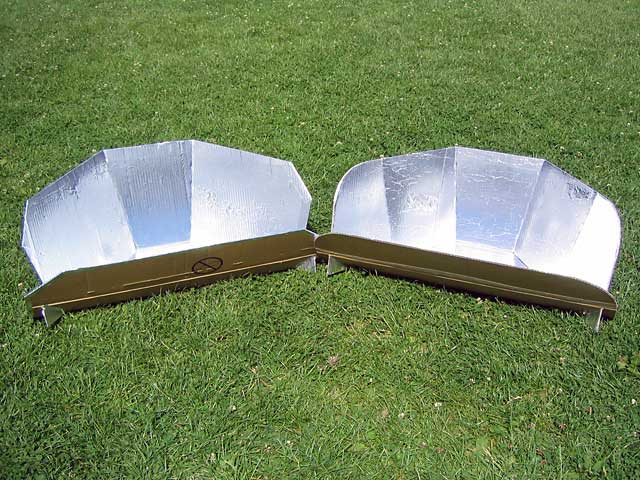
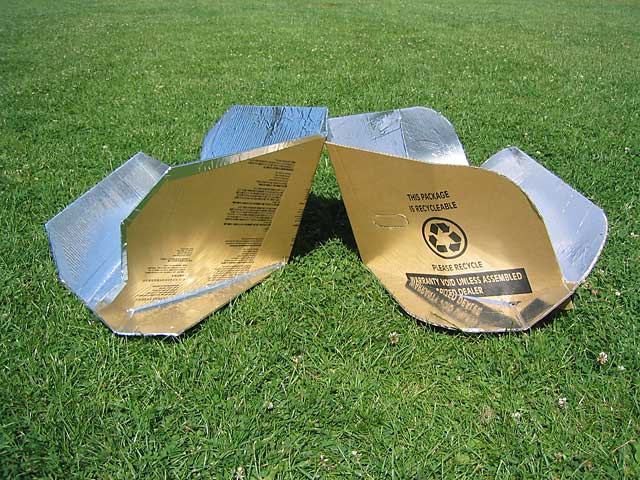
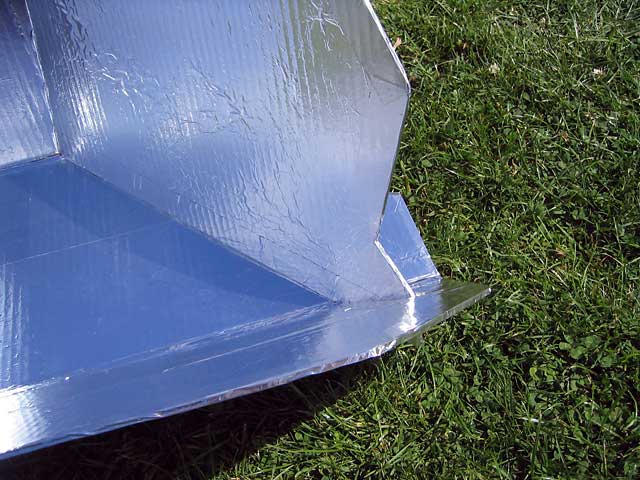
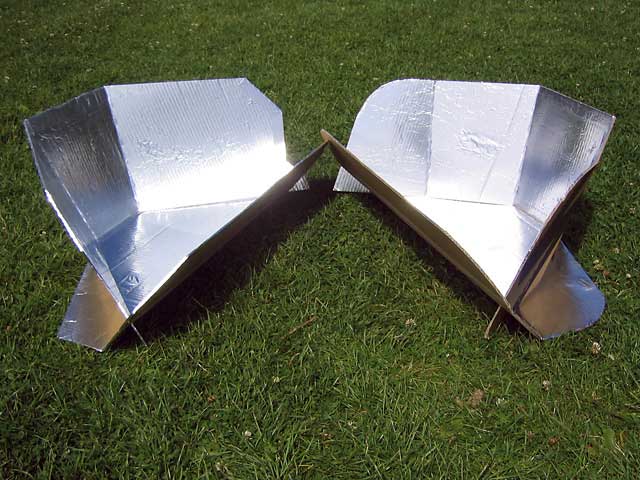
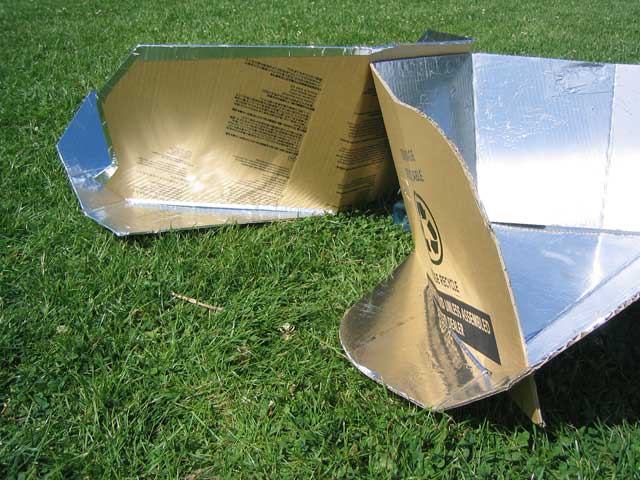
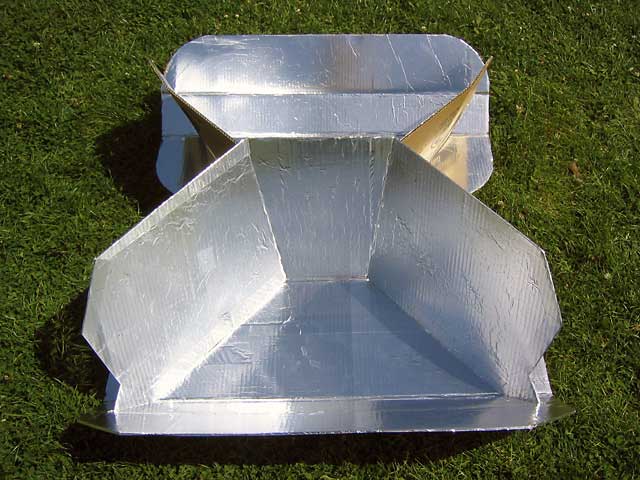
Some photos taken to compare the the classic CooKit with my proposed revision:
 |
|
| Back to top |
|
 |
coconino
Joined: 21 Nov 2006
Posts: 77
Location: Sunny Brixton
|
 Posted: Sat Jul 28, 2007 4:34 pm Post subject: Posted: Sat Jul 28, 2007 4:34 pm Post subject: |
 |
|
For interest, I've reduced my tool kit to this small set plus a metal straightedge to cut against, a board to cut on and a pot to mix the glue. The template is based on the unit size, which in this case is 1.5".
 |
|
| Back to top |
|
 |
hardwired
Joined: 22 Nov 2006
Posts: 2
Location: Ontario, Canada
|
 Posted: Tue Mar 25, 2008 10:00 pm Post subject: Posted: Tue Mar 25, 2008 10:00 pm Post subject: |
 |
|
| This is great thanks! |
|
| Back to top |
|
 |
|
|
You cannot post new topics in this forum
You cannot reply to topics in this forum
You cannot edit your posts in this forum
You cannot delete your posts in this forum
You cannot vote in polls in this forum
|
Powered by phpBB © 2001, 2005 phpBB Group
|


